Access to tyre module in MyConnectedFleet
To access the tire module, simply click on “Drivers, Vehicles & Reports.” Then, you can access the desired tab via the “Tire” menu at the top.
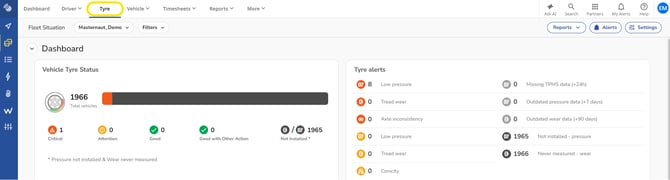
Dashboard: Fleet's tyre
The dashboard allows you to view the real-time status of your fleet’s tyres.
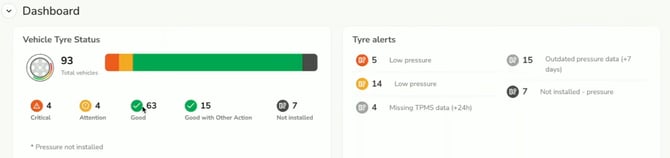
It highlights any tyres that are outside the normal operating range using colour indicators:
-
Green: OK
-
Yellow: Outside recommended range
-
Orange: Critical
The information displayed at the bottom of the page shows you, in real time or the last data detected,of all tyre-related actions that need to be addressed.
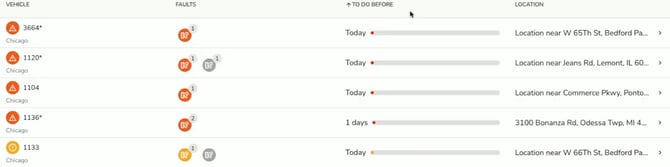

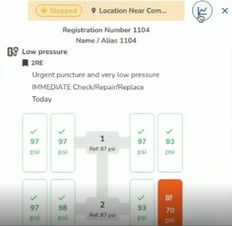
If you want more details, you can also click on a vehicle to open a second tab with tyres information about the vehicle.
In some cases, we are able to detect the specific issue affecting the tyre and will therefore display our recommendation to assist you.
For example: “Urgent puncture → Immediate Check / Repair / Replace -> Deadline: TODAY.
Tyre Data Analysis & History
If you’ve experienced an issue with a tyre and want to learn more, simply click the blue curve icon located at the top right of the opened tab.
Once the page has loaded, you can access the pressure and temperature tracking for your vehicle’s tyres.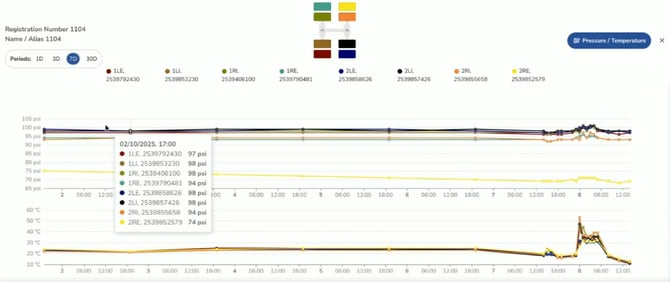
Setup TPMS alert : for pressure & temperature
To add alerts, simply click on the “Alerts” button on the right side of your screen.
You will then have access to the “Tyre Alerts” menu, where you can choose to create “Pressure alerts” or “Temperature alerts” by selecting the “Add Alerts” button and filling in all the required fields:
- Severity: Critical / Moderate
- Email Subject: Choose the title of the alert you will receive when the conditions are met.
- Group or Asset: You can choose to activate the alert for your entire fleet or select only some of your vehicles.
- Recipients: Choose the recipients of the alert by adding their email addresses. If you have opted for SMS Alerts in addition, you can also add your phone number that you would like the SMS Alerts to be sent to in the following format (+country code xxxxxxxxxx)
- Location: You can choose: None / Inside of location / Outside of location / Inside of location group / Outside of location group
- Active hours: You can choose to select one or more specific days, as well as the hours of operation during which you want alerts to be active.
Once you have filled in the fields, you can save your alert by clicking on the "Save" button at the bottom right.

TPMS alert - Vehicle settings : for pressure & temperature
If you want to adjust the tyre-related settings of your vehicles, simply go to
1. “Settings, Alerts & Locations”,
2. Then select “More”
3. And “Tyre Admin”.
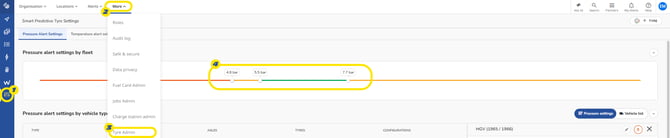
A. Pressure and temperature:
You can use the slider gauge and move the different points to define the optimal tyre usage range (4):
-
Green: normal operating range
-
Yellow: outside the recommended value
-
Orange: critical issue
B. Pressure threshold management:
The Pressure Threshold Management feature allows users to define and customize tire pressure ranges for each vehicle.
This configuration is performed directly within the Tyre Settings interface, ensuring that pressure settings are fully aligned with the axle and tire configuration of each vehicle.

For every vehicle, users can define the pressure thresholds applicable to each axle. A graphical gauge is used to represent the full operating pressure range, allowing intuitive configuration of critical, moderate, and normal pressure zones.
Each gauge is divided into four segments:
-
Low Pressure – Critical (red): below the minimum acceptable pressure.
-
Low Pressure – Moderate (orange): slightly below the nominal range, where intervention may be scheduled.
-
Optimal Range (green): the desired pressure zone for normal operation.
-
High Pressure – Moderate (orange): slightly above nominal, where overinflation may cause premature wear
These values can be customized per vehicle/axle, allowing fleets to reflect different load distributions and operational conditions across fleet configuration.
User can either change vehicle per vehicle or perform a bulk operation, by filtering and selecting multiple vehicles.

On the example bellow user chose to filter all vehicles with 3 axles, 6 Tyres and with a type HGV.

Step 1 – Filtering appropriate vehicles 
Step 2 – Clicking on select all 
Step 3 – Click on Edit, proceed with your changes that will be applied in every vehicle in bulk and click in Save button on the bottom of the page.
Measurement : Device type
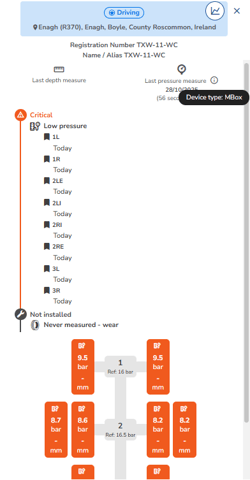
Please note that you can identify the device type that captures the tyre data for each vehicle by going to your Tyre tab and selecting the vehicle of your choice.
A panel will open on the right-hand side. By hovering your cursor over the (i) icon next to “Last pressure measure”, you will see the device type displayed.
Several device types are available, such as MBox (M400), TCU, Schmitz, Krone...
Reports
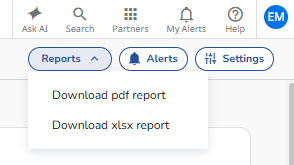 If you want to obtain and download activity reports for your vehicles’ tyres, simply select the “Reports” button (top right) and choose your preferred format: .pdf or .xlsx.
Once the system has generated the report, you will receive a document containing all of the Tyre data found within the ‘Tyre’ module, which you can then share or analyse with your team.
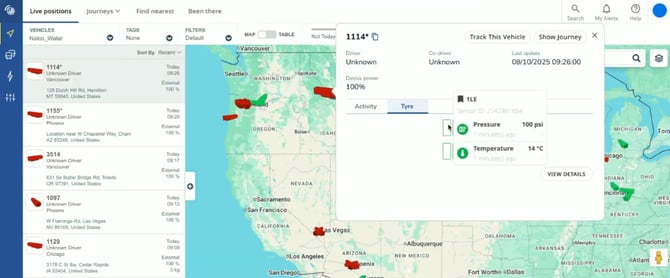
Can I view the status of my vehicles’ tyres directly from the map?
Yes, this is possible. Simply click on the vehicle of your choice, then go to the “Tyre” menu.
Of course, this feature is only available for vehicles equipped with sensors.