What is the purpose of the Groups page?
This section is where you can create your company Hierarchy in order to assign your resources (Vehicles & Drivers) to their appropriate group and level.
Where can I find the Groups page?

- First click in the main menu (on the left-hand side of the page) on “Settings Alerts & Locations” button
- Second click in the secondary menu (top of the page) on the category “Organisation” button, third click in the category on “Group” button.
- You are now able (if created) to see your sites hierarchy.
Create a group


To create a sub level to a group, click the Button and select the option titled "Create" which will open a text box. Enter the relevant name, choose the parent group and click the save button.
- Continue in this way until all groups are created at their appropriate level. Once complete you can assign your resources (Vehicles & Drivers) to their group or level.
- You have the ability to easily amend your new hierarchy by clicking on any group, dragging it to the appropriate level and dropping it in.
- Users are then assigned a group level to manage and report on their resources accordingly.
Rename a group


To rename a group, click the Button and select the option titled "Rename" and enter your company name. Once entered, click the save button.
Mass import groups
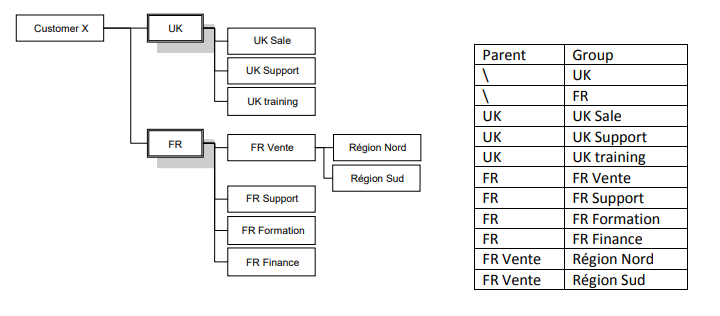
Import of new group is done relative to the parent group name.
Step 1 - Create you group list
This import method only allows the creation of groups that do not currently exist on the system. Therefore it is assumed only new groups will be added under existing parent groups.

- To import the file must be a CSV file format (in excel save as ‘CSV’)
- Then press "Save" to save your CSV document.

- A CSV will only have one sheet.
- If converted from an excel file there might be more worksheets
- Parent Group name
- Group name
The sample file contains a top (header) row in the CSV. You should not remove this row. Add your first group from second line.
Step 2 - Import your group list


After:
- "Select file" to import from the import group page
- Select the correct file in your folders
- When ready, click on "Import"
Once the import is complete the summary shows:
- Total records contained in the file
- Total records imported
- Total invalid records